

Cleaning and Refinishing Outdoor Decks
How to Revive a Deck
Strip and refinish your deck to make the woods look like new.
![]() Time
Time
Multiple Days
![]() Complication
Complication
Beginner
![]() Cost
Cost
$51–100
Introduction
Brand your weathered onetime deck look like new. We'll show you lot the whole refinishing process, with good tips on how to handle tough spots and consummate the job faster.
Tools Required
Materials Required
- Deck finish
- Deck stripper
- Painter's record
- Plastic sheeting
Bring back the glow: Deck cleaning and staining
Recollect how excited you lot were the solar day yous finished building your new deck? The smell of fresh-cut woods, the warm, fifty-fifty color of the new deck boards, that summer afternoon spent admiring the fine details that made yours the best-looking deck in the neighborhood.
Now five years later, yous hardly notice the deck as yous amble across it to take out the trash. Yes, the colors take faded, the woods is grayness and in that location may even be some mildew. Well, don't despair; this is a love affair that's hands rekindled. Information technology takes just a few days, balmy cool weather, some cleaning and stripping solution and a few small tools to get that old human relationship correct back where it started. Hither's what you demand to know near deck cleaning and staining:
Project step-by-pace (9)
Step 1
Look over your deck and exam information technology to detect out just what you need to exercise
Scrape off the stain

Scrape the old stop residue off your deck railing and decking if you have an sometime semitransparent or solid color stain. The finish will bit off easily. Don't go bogged down with details; the deck stripper will get the remainder. Earlier you revive a tired-looking deck, look it over to see that all the wood surfaces are sound. If the wood is rotten, a screwdriver volition push easily into the woods and the surface fibers will pull away easily. No amount of cleaning is going to bring it back. If you have damaged wood, supercede it with new.
Deck cleaning and staining overview
Deck cleaners are formulated to clean a deck surface whether it has a stain or sealer on it or not. All the same, if you have an one-time cease that's worn out, the cleaner will do a blotchy job. It'll make clean the worn spots differently from the spots that withal accept finish on them. Look for signs of an old cease line. A stain finish is like shooting fish in a barrel to spot because it leaves signs of article of clothing in high-traffic areas. A sealer is harder to spot, only you can tell if it'due south worn out considering it'll no longer bead water. Old sealers usually will come off with a deck cleaner. Look for a motion-picture show in areas with lower traffic. If you detect a picture, apply a stripper on the railing (like we did) to get rid of it before you apply a cleaner. Examine the railing in the aforementioned way as the deck boards.
The deck stripper is designed to lift off the old finish (stain or sealer) and get the surface ready for the deck cleaner to practise its piece of work. Save time and stripper solution past first scraping abroad most of the old finish residue, using an ordinary paint scraper a shown in Photo one. It may audio daunting, but keep in mind that you lot don't demand to get down to bare forest! Only scrape the surface enough to remove loose, flaky finish. Don't spend more than two hours doing this on an average size (10 x xvi-ft.) deck.
The deck we cleaned for this article had all sound wood, but the semitransparent oil finish on the railing was starting to flake off. And then nosotros stripped the railings before applying a cleaner. The deck boards, on the other paw, were unfinished, and then we used a deck cleaner merely. It had been several years since this deck had received whatever attention, just it cleaned up beautifully.
How to choose deck strippers and cleaners
A deck stripper is used to remove old loose stain and deck sealers, earlier cleaning and brightening. Information technology breaks the finish loose from the woods like a furniture stripper does. These products also enable you to get rid of an sometime colour and apply a new stain colour.
In that location are basically 2 types of deck cleaners: One type (liquid oxalic acid or powdered hydrogen peroxide) removes a thin layer of grayness, dead wood fibers from the surface and exposes the fresh forest below. The other type has a bleach base that removes cruddy blackness and green stains on the surface such as mildew. If you detect this condition, make clean off the mildew start and rinse, then utilise a standard deck cleaner.
For the best buy, pay attention to the concentration of cleaner in the 1-gallon plastic jug. Some of the cleaners announced to cost more than, only on closer inspection, you lot'll meet that the gallon container mixes with h2o to brand 5 gallons of cleaning solution (plenty for a large deck).
Expert Tips for How to Build a Deck
Step 2
Become the correct tools and prophylactic gear for deck cleaning and staining
Protect your plants

Cover your plants with plastic sheets once you've soaked them with water. Near strippers and deck cleaners won't ruin your plants just tin bailiwick them to unnecessary stress. Fifty-fifty though this deck cleaning and staining project is depression-tech, there are a few things yous probably demand to buy. Become rubber boots and rubber gloves. I like the gloves that cover up the forearms to protect against stripper that splatters and drips. Purchase a paint applicator like the 1 shown in Photograph iii to apply stripper. I've tried brushes and rollers and this tool beats them all. Yous'll too need a 1- or 2-gallon pump sprayer (buy one specifically for deck cleaners) and a hand-held stiff-bristle nylon scrub castor to scrub the stripper afterwards you lot apply it. For scrubbing the deck surface, you lot can use a potent castor (and I mean stiff!) with a pole handle similar the one shown in Photo 7. Also wear condom spectacles and erstwhile apparel because the stiff bristles of the scrubbing brushes tin can spit tiny aerosol everywhere.
You'll also desire to protect any plants surrounding your deck (photo 2). Be sure to remove the plastic soon afterwards cleaning and rinsing and so information technology won't stress the plants.
Skip this job on a hot, sunny day—go to the beach instead
Both strippers and cleaners evaporate rapidly and become ineffective on hot, dry days. A cool, clouded twenty-four hour period extends the working time of these solutions. Also, you'll want to make this messy chore as comfy equally you tin can. This is hard piece of work, so await to sweat. You lot can piece of work on the deck in sections (stripping railing sections) over several days if y'all don't have an eight-hour cake of time to do the whole deck.
Trex Decking: Here's What You Need to Know
![]()
Step 3
Keep strippers and cleaners working by keeping them moisture
Strip railings first
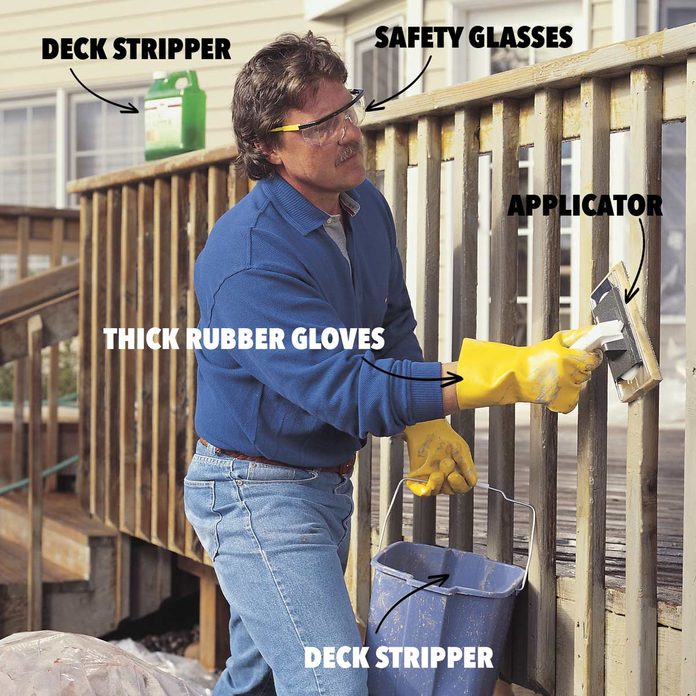
APPLY the stripper with a pigment applicator or a brush. Proceed the surface moist; don't get ahead of yourself. Work just a half dozen-ft. section of deck railing at a time so the stripper won't evaporate before y'all can scrub and scrape it. Rebuild an Old Deck With New Decking and Railings
Stride 5
Blast off the gunk

Rinse the old end away with a brisk stream of h2o from your garden hose. Y'all may accept to reapply stripper if some finish is left on the wood. You pressure wash a deck at 1,000 psi, but be warned that also much water pressure could ruin the soft fibers of the wood. We had excellent results with a spray nozzle and regular water pressure level.
How to Build a Cedar Deck Railing With Glass
Step vi
Clean the deck

Spray the deck surface with deck cleaner the mean solar day after you've completed the railing. Also employ the deck cleaner to the railing with a sprayer, considering the stripper may take darkened the wood. The cleaner volition bring the stripped surfaces back to a fresh, vivid wood look.
14 DIY Deck Add-Ons That are Seriously Cool
Step seven
Scrub the deck
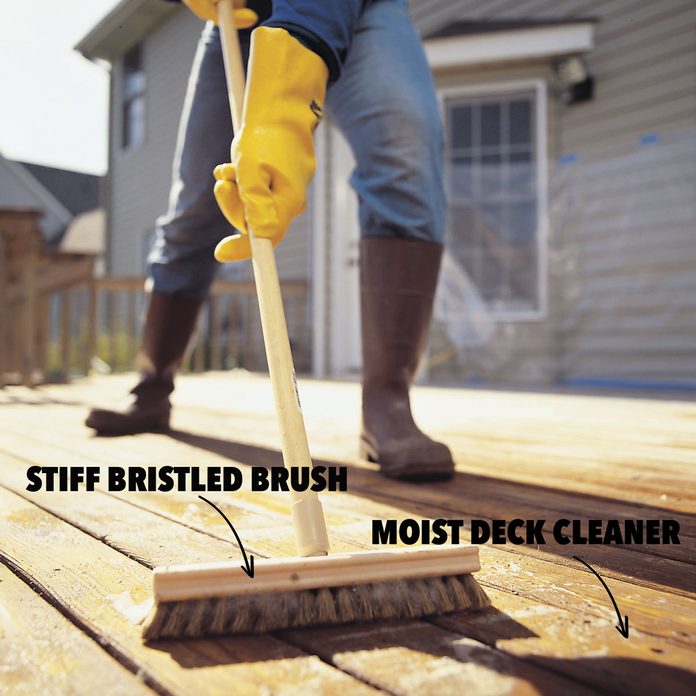
Scrub abroad the loose wood fibers and residue 15 minutes after yous've practical the cleaner. Work the brush deeply into the woods in the direction of the grain. As soon as you're finished, rinse the deck thoroughly with a firm spray from your garden hose and let the surface dry for at least two days. Insects and spiders are nearly the only things I've seen that'll stay put on a vertical surface. In contrast, strippers run down vertical surfaces easily. The only fashion to go on the stripper in contact with the wood is to constantly go back with your applicator and smear the stuff to the top, equally shown in Photo three.
Y'all only need to continue the stripper in contact with the wood for 15 minutes, then scrub and rinse as shown in Photograph v.
Mix your cleaner according to the directions on the container. Many deck cleaners are full-bodied and require additional water. Stir the mixture with a clean slice of wood and put the top back on. Pump the sprayer until you feel resistance (usually about 25 pumps or and then). And so grab the wand and spray the solution on the deck surface (Photo vi). Wait about xv minutes earlier you start to scrub (Photo 7). After scrubbing, flush the surface with your garden hose sprayer until the deck looks clean. It'due south all-time to work small sections at a time as shown in Photo 6; otherwise, the solution volition dry before you get a hazard to scrub the surface with a potent castor.
31 Tips for Repairing, Updating and Maximizing Your Deck
Step 8
Employ a quality finish to protect your deck
Stain the railing
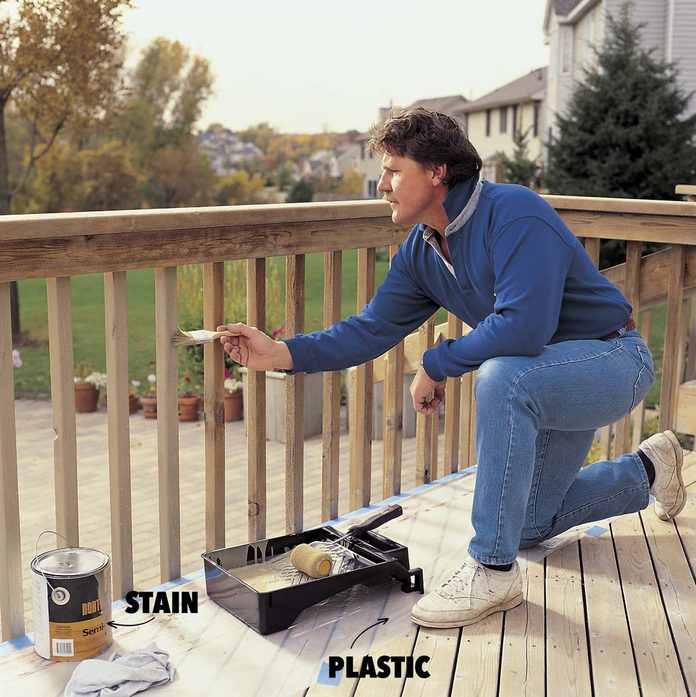
Brush your stain onto the railings. Cover your deck boards with tape and plastic to catch the drips. We recommend a semitransparent oil stain. Solid colour stains have heavy paint that'll exist tough to renew the next fourth dimension you refinish the deck.
How to Build a Platform Deck
Step 9
Seal the deck

Roll on your decking sealer with a roller. Nosotros used a articulate finish with just a bit of amber tone to warm the color of the decking. If you have tightly spaced deck boards, utilize a brush to get between them (a couple of boards at a time) as you coil. Let your deck dry for a couple of days before applying a sealer or stain. For our deck railing, nosotros applied a semitransparent oil stain mixed to match the siding of the house. We brushed it on (Photo eight) and carefully cutting in around the deck boards. We didn't want a colored stain on the deck boards, so nosotros practical a clear finish/sealer (Photo nine). This finish looked not bad and gave the decking a warm, fresh await. Avert using stain on the deck boards because they quickly bear witness wear.
Keep an center on your deck and be prepared to clean and reseal it every couple of years. The longer you look, the more weather-related damage can occur.
Dream Deck Plans
Originally Published: September 16, 2019
friedmanorwil1946.blogspot.com
Source: https://www.familyhandyman.com/project/how-to-revive-a-deck/
0 Response to "Cleaning and Refinishing Outdoor Decks"
Post a Comment